Backup Your Important Data
To start the Backup Utility in Windows XP Professional:
- Open Backup. (Click Start, point to All Programs, point to Accessories, point to System Tools, and then click Backup.)
- The Backup or Restore Wizard starts by default, unless you disabled it. If the Backup or Restore Wizard does not start by default, you can still use it to back up files by clicking the Tools menu, and then clicking Backup Wizard.
- Click the Next.
- In the Window that asks What do you want to do? click the circle next to Back up files and settings. Then click Next.

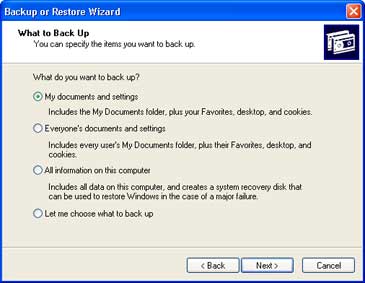
Choosing what to back up
As you can see as below, the Backup Utility lets you decide how much information on your computer that you'd like to back up.
Choose where to store your backup
In the next Window you'll select the type of backup, the place you want to save your backed up files, and what you'd like to name them. Unless you have access to backup tape (most people don't), the first option will default to File.
Under Choose a place to save your backup the default choice is drive A, which is usually your floppy drive (if you have one.) You probably won't be able to backup everything you need to on a floppy. You're best bet would be to click Browse and choose any of the following locations:
- Your computer's hard disk. The ideal backup location is a separate partition from the one you're backing up. If your hard disk is partitioned into drive C and drive D and your data is on drive C, you can safely back up to drive D.
- A Zip drive or other removable media. At 100—250MB per disk, this is an option if you don't have multiple gigabytes to back up. Unfortunately, the Windows Backup utility can't save files directly to a CD-RW drive
- A shared network drive. You're limited only by the amount of free space on the network
- An external hard disk drive. These drives are no longer as expensive as they once were and work well as an external backup device.
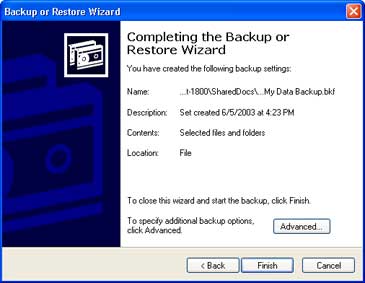
After you've chosen a backup location, enter a descriptive name for the file, click Next to display the wizard's final page, as shown below, and then click Finish to begin backing up immediately and review your backup settings
Compatible... 30 Days Money Back
 Online Support